A few years ago, I saw a post in OMG Ubuntu about how to use an iPad as an external monitor using the RDP protocol, but I wasn’t able to get it to work. Now I tried it again and it finally worked! Here is how I did it.
Ubuntu 25.04 (Wayland)
Enable extendable virtual monitors over RDP with the command:
gsettings set org.gnome.desktop.remote-desktop.rdp screen-share-mode extendOpen Settings > System > Remote Desktop and enable Desktop Sharing.
If you want to use the touch screen enable Remote Control. Just keep in mind that the touch screen will work as a mouse (a tap is a click) since there isn’t full support for it.
In this screen, you also need to set your Login Details that will be used to connect your iPad.
Important: For security reasons, disable Desktop Sharing when you’re not using it.
iPad
In your iPad, install Windows App Mobile (previously Remote Desktop).
Tip: there isn’t a “confirm” button in most of the app screens, you need to click in the < (go back) icon in the top left corner.
When you open the app, click on the + (plus) icon in the top right corner, select PC and fill out the following settings:
- Computer Name
- Add the IP from your computer (I tried using the Hostname and I didn’t work for me). To get the IP you can use one of these two options:
- Open Settings > Wi-Fi > Click on the cog icon from the network you’re connected > Tab: Details > IPv4 Address.
- Run the command
hostname -Iin your terminal and get the first IP (e.g.192.168.113.87).
- Important: Your computer and the iPad need to be in the same network.
- Add the IP from your computer (I tried using the Hostname and I didn’t work for me). To get the IP you can use one of these two options:
- Credentials
- For a first test, you can leave to ask when needed, but if you’re doing this often, it’s worthwhile to saved it.
- Important: This is the credential that you set in the Remote Control settings, not your normal Ubuntu login credential.
- Device and audio redirect
- Sound: Select
Don't reproduce soundto don’t replicate the sounds in your iPad; - I set everything else to
disable.
- Sound: Select
- Click on Save (top right corner)
Now click on the new Saved Devices item that it should ask you for login credentials
Additional settings
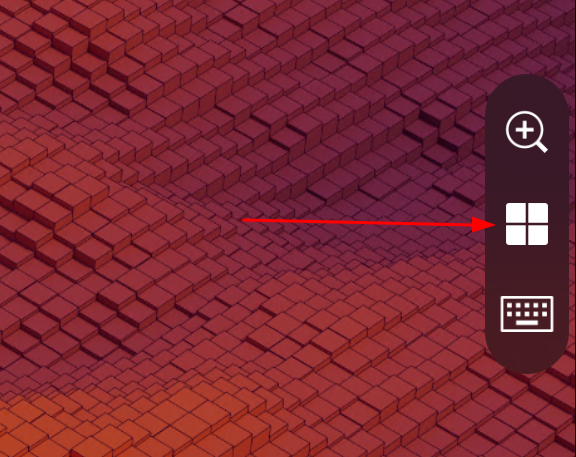
After you’re connected to the computer there is a floating bar at the right corner of the screen and if you click in the Windows icon you will be able to change the following settings:
- Show a mouse cursor. I’m not using it because it doesn’t work, the cursor stays fixed in the middle of the screen;
- A “touch mode” that hides the mouse cursor. This is what I’m using;
- Change the screen resolution. I use a smaller resolution so it’s easier to read text on it.
If you change the iPad orientation from horizontal to vertical it will automatically detect and update it.
Mouse cursor support for RDP
In January 2023 an issue was created to make the cursor visible over RDP and in April 2025 there was an update, and it seems that this feature will be added if you manually run gsettings set org.gnome.desktop.remote-desktop.rdp cursor-mode embedded. But this is not merged in yet, so we will have to wait.
In the issue discussion, I found a nice workaround from Silas Moura: install the GNOME Extension called Eye on Cursor and use the Mouse Tracker feature to create a “new cursor” that will be displayed in the iPad. Here is the setting I’m using:
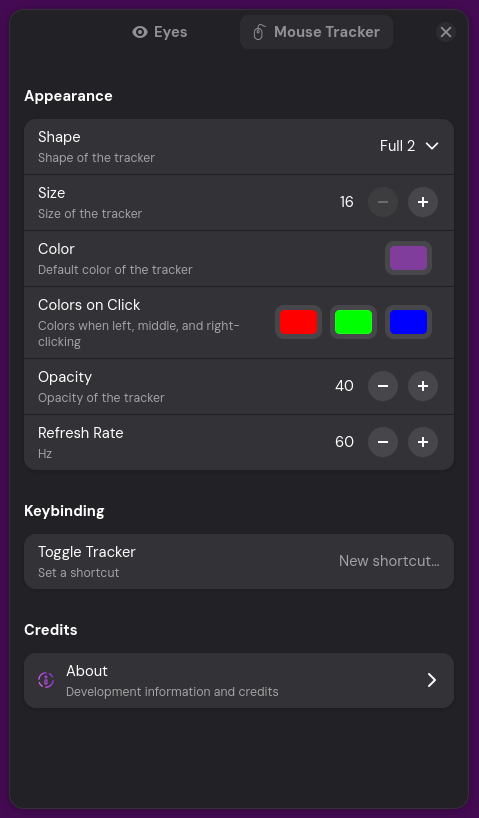
This will add a purple circle to my cursor. This is how it looks in the iPad:
It’s not perfect, but it does the job. When I’m not using the iPad as an external monitor, I keep the tracker disabled.
Leave a Reply